This tutorial shows you how to embed a live camera feed on your website without relying on cloud services. You will be able to blur out or fully censor sensitive areas using a easy-to-use GUI. Only very basic command-line knowledge is required.
Why Self-Host?
- Privacy: Your video stays on your infrastructure
- No subscription fees
- Full control over stream quality, latency and privacy
- It’s fun: You learn about video streaming, FFmpeg and server management
Prerequisites:
- An IP camera with RTSP support (I used an Arenti Q3 since it’s cheap, reliable, and supports night vision).
- A Linux server with nginx installed (Ubuntu Server in my case, works with Debian and Raspberry Pi OS just as well). This could just as well be a VPS, but this defeats the purpose if you ask me.
- A domain name (optional but highly recommended for HTTPS). In this example, I’m using camera.domain.com. Replace this with whatever domain or subdomain you’re using. Make sure this domain always points to your server. If you don’t have a static IP for your home network, I recommend ddclient with Cloudflare DNS. It is very simple to set up and has been very reliable in my experience.
- Basic command-line knowledge.
Step 1: Enable RTSP on your camera
Most modern IP cameras support RTSP, but it’s often disabled by default for security reasons. For my Arenti O3:
- Open the Arenti mobile app
- Go to Settings -> Advanced Service -> Onvif Settings
- Enable ONVIF and set a password.
- RTSP should be enabled on port 8554
Make sure to set a static local IP for your camera to make your life easier. You can do this in your Router settings.
Your camera’s RTSP URL will typically look like:
rtsp://admin:PASSWORD@192.168.0.XX:8554/Streaming/Channels/101Test it locally first using VLC or MPV:
mpv rtsp://admin:PASSWORD@192.168.0.XX:8554/Streaming/Channels/101Step 2: Convert RTSP to HLS on your server
Web browsers can’t play RTSP streams directly, so we need to convert it to HLS (HTTP Live Streaming) using FFmpeg.
Install FFmpeg:
sudo apt update
sudo apt install ffmpeg
Create a streaming script
sudo nano /usr/local/bin/stream-camera.sh#!/bin/bash
RTSP_URL="rtsp://admin:PASSWORD@192.168.0.XX:8554/Streaming/Channels/101"
OUTPUT_DIR="/var/www/html/camera-stream"
mkdir -p $OUTPUT_DIR
ffmpeg -i $RTSP_URL \
-c:v copy \
-an \
-f hls \
-hls_time 2 \
-hls_list_size 3 \
-hls_flags delete_segments \
-hls_allow_cache 0 \
$OUTPUT_DIR/stream.m3u8As always, make sure to replace the PASSWORD and the local IP with the password you set for the camera stream and the static IP you set for your camera.
Then make the script executable:
sudo chmod +x /usr/local/bin/stream-camera.sh- Set up directories and proper permissions:
sudo mkdir -p /var/www/html/camera-stream
sudo chown www-data:www-data /var/www/html/camera-stream
sudo chmod 755 /var/www/html/camera-stream
Step 3: Configure nginx
Create a new nginx configuration:
sudo nano /etc/nginx/sites-available/camera-streamserver {
listen 80;
server_name camera.yourdomain.com; #REPLACE
location /camera-stream/ {
alias /var/www/html/camera-stream/;
# CORS headers for embedding on external sites
add_header Access-Control-Allow-Origin *;
add_header Access-Control-Allow-Methods 'GET, OPTIONS';
add_header Access-Control-Allow-Headers 'Range';
add_header Cache-Control no-cache;
types {
application/vnd.apple.mpegurl m3u8;
video/mp2t ts;
}
}
}Enable the site:
sudo ln -s /etc/nginx/sites-available/camera-stream /etc/nginx/sites-enabled/
sudo nginx -t
sudo systemctl restart nginx
Add HTTPS (recommended):
sudo apt install certbot python3-certbot-nginx
sudo certbot --nginx -d camera.yourdomain.com
Step 4: Run as a Service
Create a systemd service to keep the stream running:
sudo nano /etc/systemd/system/camera-stream.service[Unit]
Description=Camera RTSP to HLS Stream
After=network.target
[Service]
ExecStart=/usr/local/bin/stream-camera.sh
Restart=always
User=www-data
[Install]
WantedBy=multi-user.targetEnable and start:
sudo systemctl daemon-reload
sudo systemctl enable camera-stream
sudo systemctl start camera-stream
Check if it’s working:
sudo systemctl status camera-stream
sudo journalctl -u camera-stream -f
Step 5: Embed on your website
Add this HTML to your website. If you’re using WordPress, add a Custom HTML block:
<div style="max-width: 800px; margin: 0 auto;">
    <video id="webcam-video" controls style="width: 100%; height: auto;"></video>
</div>

<script src="https://cdn.jsdelivr.net/npm/hls.js@latest"></script>
<script>
    var video = document.getElementById('webcam-video');
    var videoSrc = 'https://camera.yourdomain.com/camera-stream/stream.m3u8';

    if (Hls.isSupported()) {
        var hls = new Hls();
        hls.loadSource(videoSrc);
        hls.attachMedia(video);
    } else if (video.canPlayType('application/vnd.apple.mpegurl')) {
        video.src = videoSrc;
    }
</script>
Step 6: Add Privacy Controls (Blur/Black Boxes):
In case you don;t want to broadcast your neighbor’s windows or other sensitive areas, we can use FFmpeg to blur or cover specific regions.
I created an interactive web tool that lets you view your livestream, drag and resize boxes over areas you want to blur, and get the exact FFmpeg command to copy-paste.
You can soon find the tool on my website. The code is also hosted on my github. A short usage guide is included.
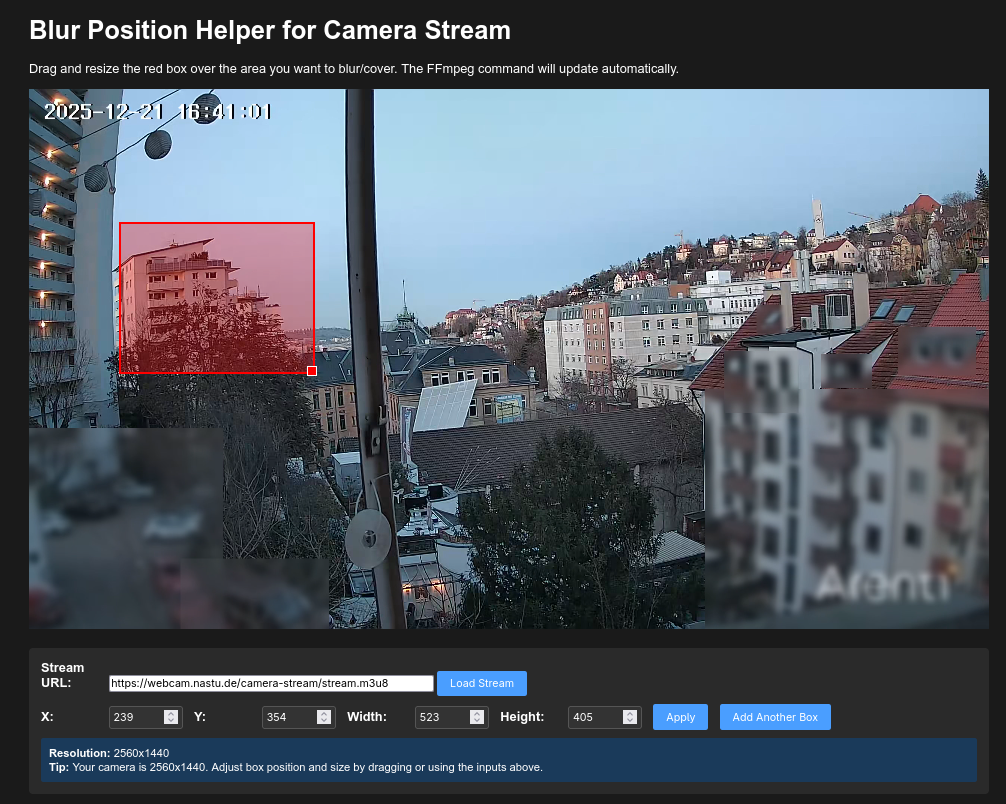
Then edit your streaming script with the generated command. For example:
sudo nano /etc/systemd/system/camera-stream.service#!/bin/bash
RTSP_URL="rtsp://admin:PASSWORD@192.168.0.XX:8554/Streaming/Channels/101"
OUTPUT_DIR="/var/www/html/camera-stream"
mkdir -p $OUTPUT_DIR
ffmpeg -i $RTSP_URL \
-filter_complex "[0:v]split[base0][tocrop0];[tocrop0]crop=400:300:100:50,boxblur=10[blurred0];[base0][blurred0]overlay=100:50[v]" \
-map "[v]" \
-c:v libx264 -preset ultrafast -tune zerolatency \
-an \
-f hls \
-hls_time 2 \
-hls_list_size 3 \
-hls_flags delete_segments \
-hls_allow_cache 0 \
$OUTPUT_DIR/stream.m3u8Important notes:
- Blur radius must be appropriate for box size, smaller boxes need smaller blur values. Too small of a blur radius will break the stream. A radius of 20px for a box under 100px in size is probably too small, just experiment with the values. 10-20px should be adequate for most boxes.
- Black boxes are more CPU-efficient than blur if you have many areas to cover.
- My 2560×1440 camera stream with 7 blur boxes uses about 30% CPU on my Ubuntu server (Intel i5 12100).
Finally, restart the service:
sudo systemctl restart camera-streamTroubleshooting
Stream won’t load
# Check service status
sudo systemctl status camera-stream

# View logs
sudo journalctl -u camera-stream -n 50

# Verify files are being created
ls -la /var/www/html/camera-stream/
Permission denied errors
sudo chown -R www-data:www-data /var/www/html/camera-stream
sudo chmod -R 755 /var/www/html/camera-stream
Camera connection refused
- Check if ONVIF/RTSP is still enabled in camera settings
- Verify camera is online:
ping 192.168.0.XX- Check if port is open:
nmap -p 8554 192.168.0.XXBlur filter errors (“Invalid chroma_param radius”)
- Reduce blur radius for small boxes
Security Tips
- Use HTTPS, Browsers will block HTTP content on HTTPS sites
- Don’t expose RTPS directly
- Use strong passwords
- Add nginx basic auth if needed
- Disable audio: Add -an flag if you don;t want audio streamed
Latency
HLS has inherent latency of 6-30 seconds due to segment-based delivery. If you need lower latency:
- Reduce hls_time to 1 second (increases server load)
- Cosider WebRTC solutions like mediamtx
- Use RTMP streaming
Cost
- Camera: ~20-30€
- Server: Free if already running, or ~20€ for a minimal setup using a Raspberry Pi Zero 2
- Domain: less than 10€ a year